Friday, January 30, 2009
Uploading multiple images photos
The Blogger post editor has a photo upload icon which when clicked upon will open the photo upload dialog window (see screen shot below):
Click CHOOSE FILE and select the image you want to upload from your computer, then tick the radio button for one of 4 layouts - none, left, center right. If you have only 1 photo to upload, then click UPLOAD IMAGE. If you have multiple images and you want the same layout for all of them, then click ADD ANOTHER IMAGE, in which case another CHOSE FILE button will appear. Chose your second image from your computer. Repeat for more images, and when you have finished selecting all the images, click UPLOAD IMAGE.
Related posts:
Adding images to your posts
How to delete photos
Make images a clickable hyperlink
Uploading and manipulating images
Uploading and manipulating images Part 2
Tip: Complete the alt="" for images
Using the Irfanview Photo Editor
SEO Tip: Upload images whenever you can
Horizontal navigation menu bar table
Horizontal menu bar (navigation bar) is a frequent request of bloggers. There are many ways of doing it, including using CSS (Cascading style sheet) and <ul> (unordered list). Using table to create a horizontal menu bar (navigation bar) is a quick and dirty way like what has been done at Songs Lyrics Video. However, refer to Why tables are bad.
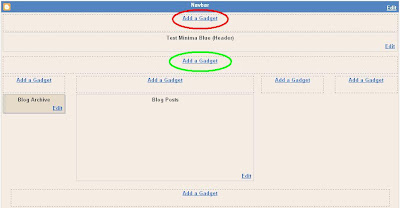
This will result in additional ADD A GADGETs to the Header section of the LAYOUT. If you are using either 3 column Minima template or the 4 column Minima template modified by me, that would already have been done and you will see a LAYOUT like the screen shot below:
The additional ADD A GADGETs are highlighted with red and green ellipses. Depending on where you want the menu bar to be position, click on either one. In the case of Songs Lyrics Video, I have chosen to positioned it within the Header, so I clicked the one highlighted with the red ellipse. I then chose HTML/Javascript gadget and typed the following (formated for easy reading):
<table border="1"><tr>
<td><a href="URL 1">tab 1</a></td>
<td><a href="URL 2">tab 2</a></td>
<td><a href="URL 3">tab 3</a></td>
..................
..................
..................
</tr></table>
You can add as many........ as you like.
Menu bar with table
First, go to LAYOUT > EDIT HTML and look for showaddelement='No' and change it to showaddelement='yes'. If there is a maxwidgets='1' next to showaddelement='yes', change it to maxwidgets='' showaddelement='yes'This will result in additional ADD A GADGETs to the Header section of the LAYOUT. If you are using either 3 column Minima template or the 4 column Minima template modified by me, that would already have been done and you will see a LAYOUT like the screen shot below:
The additional ADD A GADGETs are highlighted with red and green ellipses. Depending on where you want the menu bar to be position, click on either one. In the case of Songs Lyrics Video, I have chosen to positioned it within the Header, so I clicked the one highlighted with the red ellipse. I then chose HTML/Javascript gadget and typed the following (formated for easy reading):
<table border="1"><tr>
<td><a href="URL 1">tab 1</a></td>
<td><a href="URL 2">tab 2</a></td>
<td><a href="URL 3">tab 3</a></td>
..................
..................
..................
</tr></table>
You can add as many
Subscribe to:
Posts (Atom)